esp32: Tasmota
了解半导体行业几个单词:
- Vendor(供应商):供应商是指向其他企业或消费者提供产品或服务的个人或公司。他们通常购买产品或原材料并转售,或提供特定的服务。
- Manufacturer(制造商):制造商是指原材料或组件中制造产品的公司。他们负责设计、生产、和组件产品,并将其推向市场。
固件介绍
Tasmota 是什么呢?官方介绍如下:
Open source firmware for ESP devices
释义:Tasmota是ESP 设备的开源固件
Total local control with quick setup and updates. Control using MQTT, Web UI, HTTP or serial. Automate using timers, rules or scripts. Integration with home automation solutions. Incredibly expandable and flexible.
释义:通过快速设置和更新实现全面的本地控制。使用MQTT、Web UI、HTTP 或 串口进行控制。使用定时器、规则或脚本实现自动化。支持与家庭自动化解决方案集成。令人难以置信的可扩展性和灵活性。
Tasmota 是 Theo Arends 在 2016 年 发起的针对ESP 8622设备的开源项目,随着项目的逐步完善,已经适配了乐鑫 ESP8266、ESP8285、ESP32、ESP32-S 或 ESP32-C3 芯片,最新Release 版本是 v14.4.0,License 是 GPL-3.0。
烧录方式
Tasmota 可以通过多种方式对ESP设备进行固件烧录:
Web
直接从网络浏览器将固件烧录至ESP设备(本质上是网络浏览器调用 Web Serial API)。
Tasmotizer
专为与 Tasmota 配合使用而设计,具有易于使用的GUI 和 esptool.py。不过仅适用于 ESP82XX,例如 ESP8266、ESP 8285。
esptool.py
Esptool 是 Espressif 官方的 ESP 芯片刷机工具。它需要 Python,如果你没有安装 Python 2.x 或 3.x,请从https://www.python.org下载并安装(建议安装 Python 3.x)。
如果电脑已经安装 Python ,那么可以使用 pip 进行安装,命令:
pip install esptool如果之前安装过
ESP-IDF,那么不用重新安装 esptool。1
2
3
4
5
6
7
8
9
10
11
12
13
14
15
16
17
18
19
20
21
22
23
24alex@alex-NMH-WCX9:~/.espressif/python_env/idf5.2_py3.10_env/bin$ ll
total 376
drwxrwxr-x 3 alex alex 4096 8月 9 21:22 ./
drwxrwxr-x 5 alex alex 4096 8月 8 14:21 ../
-rw-r--r-- 1 alex alex 2045 8月 8 14:20 activate
-rw-r--r-- 1 alex alex 971 8月 8 14:20 activate.csh
-rw-r--r-- 1 alex alex 2251 8月 8 14:20 activate.fish
-rw-r--r-- 1 alex alex 9033 8月 8 14:20 Activate.ps1
-rwxrwxr-x 1 alex alex 258 8月 8 14:23 alldefconfig*
-rwxrwxr-x 1 alex alex 258 8月 8 14:23 allmodconfig*
-rwxrwxr-x 1 alex alex 257 8月 8 14:23 allnoconfig*
-rwxrwxr-x 1 alex alex 258 8月 8 14:23 allyesconfig*
-rwxrwxr-x 1 alex alex 3867 8月 8 14:23 bin2hex.py*
-rwxrwxr-x 1 alex alex 279 8月 8 14:23 compote*
-rwxrwxr-x 1 alex alex 15881 8月 9 21:22 configure_esp_secure_cert.py*
-rwxrwxr-x 1 alex alex 255 8月 8 14:23 defconfig*
-rwxrwxr-x 1 alex alex 263 8月 8 14:23 doesitcache*
-rwxrwxr-x 1 alex alex 278 8月 8 14:23 esp-coredump*
-rwxrwxr-x 1 alex alex 1224 8月 8 14:23 espefuse.py*
-rwxrwxr-x 1 alex alex 263 8月 9 21:22 esp-matter-mfg-tool*
-rwxrwxr-x 1 alex alex 10540 8月 8 14:23 esp_rfc2217_server.py*
-rwxrwxr-x 1 alex alex 1229 8月 8 14:23 espsecure.py*
-rwxrwxr-x 1 alex alex 1219 8月 8 14:23 esptool.py*
...
初始配置
ESP设备烧录 Tasmota 固件,需要进行一些初始配置,例如网络配置。
Tasmota 可以使用多种方式进行初始配置:
Web
通过 Web 烧录固件完成后,可以点击 “下一步”,扫描附近 Wi-Fi 网络,用户需要选择目标网络和输入密码进行连接。
Web UI
ESP设备烧录固件后,用户可以通过智能终端(智能手机、笔记本电脑、平板电脑)搜索到ESP设备的AP热点,AP热点的名称:
tasmota_XXXXXX-####的 Wi-Fi AP (其中XXXXXX是从设备的 MAC 地址派生的字符串,####是数字)。当用户使用智能终端连接上ESP设备的AP热点后,将会自动拉起Web UI,在这个页面用户可以对ESP设备进行网络配置。串口调试工具
ESP设备烧录固件后,用户可以通过 “串口调试工具” 向ESP设备发送命令,对ESP设备进行网络配置。
可以使用 putty (通过UI操作),也可以使用 minicom(通过命令行操作),或者通过
idf.py -p /dev/ttyUSB0 monitor操作(前提是已经安装了 ESP-IDF,并加载了环境)。
固件升级
随着 Tasmota 不断开发和完善,支持的功能越来越多。用户想体验新功能,就要升级固件版本。
基于 ESP 的设备可用内存有限。为了确保有足够的内存来刷新固件,最好将总大小保持在尽可能小的水平,并且绝对不要超过 625K,以确保可以进行 OTA 更新。
Tasmota 可以使用多种方式进行固件升级:
Web UI
通过无线方式升级设备固件(又称 OTA, Over The Air)是最方便的升级方式。
用户需要即可以选择 通过网络服务器升级 或 通过上传文件升级。
命令
通过MQTT、Web 请求 、 Web UI 中的控制台使用命令行进行升级
串口
通过串口进行升级
固件使用
待补充
网页用户界面
用户可以通过 WebUI 方式登录到 Tasmota 设备,并进行一系列配置。 Tasmota 支持通过以下方式控制:
- MQTT
- Web requests
- webUI
- serial
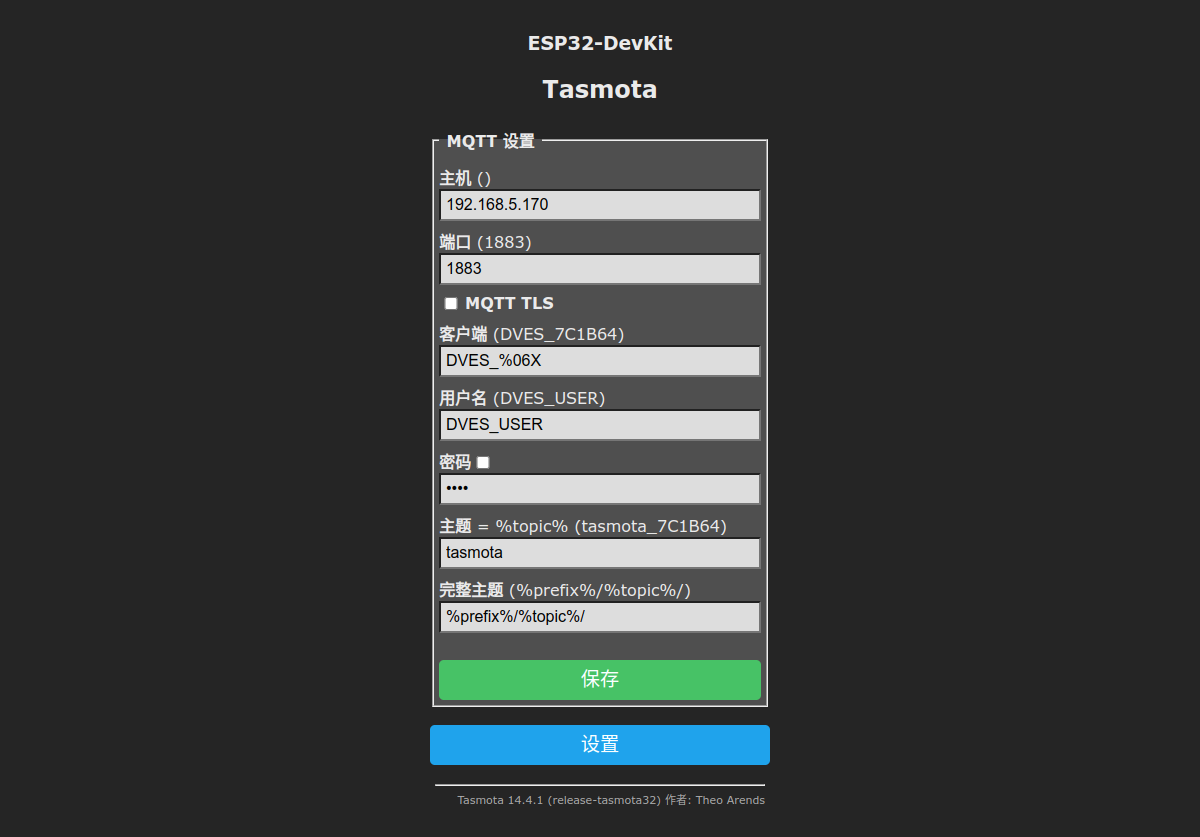
MQTT
设置 MQTT 信息后,可以查询到如下信息:
1 | MQTT 主机 192.168.5.170 |
MQTT 上的命令是使用主题:cmnd/%topic%/<command> 和有效负载组成,其中 %topic% 就是Tasmota MQTT设置时,由用户定义的;而 command 则可以是 Tasmota 定义的命令,例如:Power、Dimmer
使用 MQTT 客户端 EMQX 连接到 MQTT Broker,并订阅所有主题:# ,可以看到如下信息:
Tasmota 遗嘱消息:
1 | # Tasmota 在线 |
Tasmota 发现:
1 | Topic: tasmota/discovery/9015067C1B64/config, QoS: 0 |
Tasmota 状态(默认每5分钟上报一次):
1 | Topic: tele/tasmota/STATE, QoS: 0 |
在 ESP32-DevKitC-1 开发板的IO4上接一个LED灯,并在 WebUI 的 GPIO 4 映射为 PMW。
1 | # 查看 Power 状态 |
1 | # 控制 Power 状态,Power 表示第一个继电器,也可以是 Power1 |
1 | # 查看 Dimmer (0 ~ 100) |
1 | # 控制 Dimmer |
在 ESP32-DevKitC-1 开发板的IO14上接上一个DHT11温湿度传感器。Tasmota 会上报温湿度数据:
1 | Topic: tele/tasmota/SENSOR, QoS: 0 |
另外,DHT11温湿度传感器也会作为一个可发现设备上报:
1 | Topic: tasmota/discovery/9015067C1B64/sensors, QoS: 0, Retained |
web request
Tasmota也支持通过发送 HTTP 请求,例如:
1 | http://<ip>/cm?cmnd=Power%20TOGGLE |
注意:%,空格space = %20,分号; = %3B
如何已经设备了Web用户界面访问的账户和密码,则使用下面形式:
1 | http://<ip>/cm?user=<username>&password=<password>&cmnd=Power%20On |
控制操作:

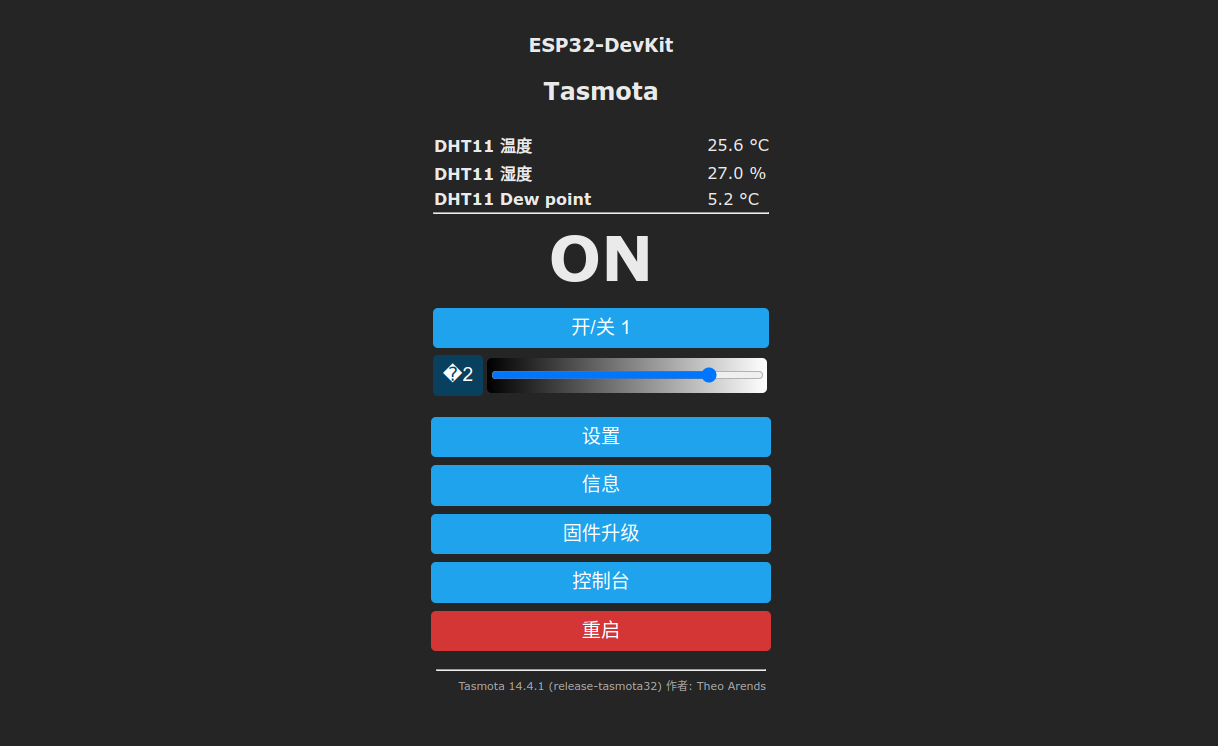
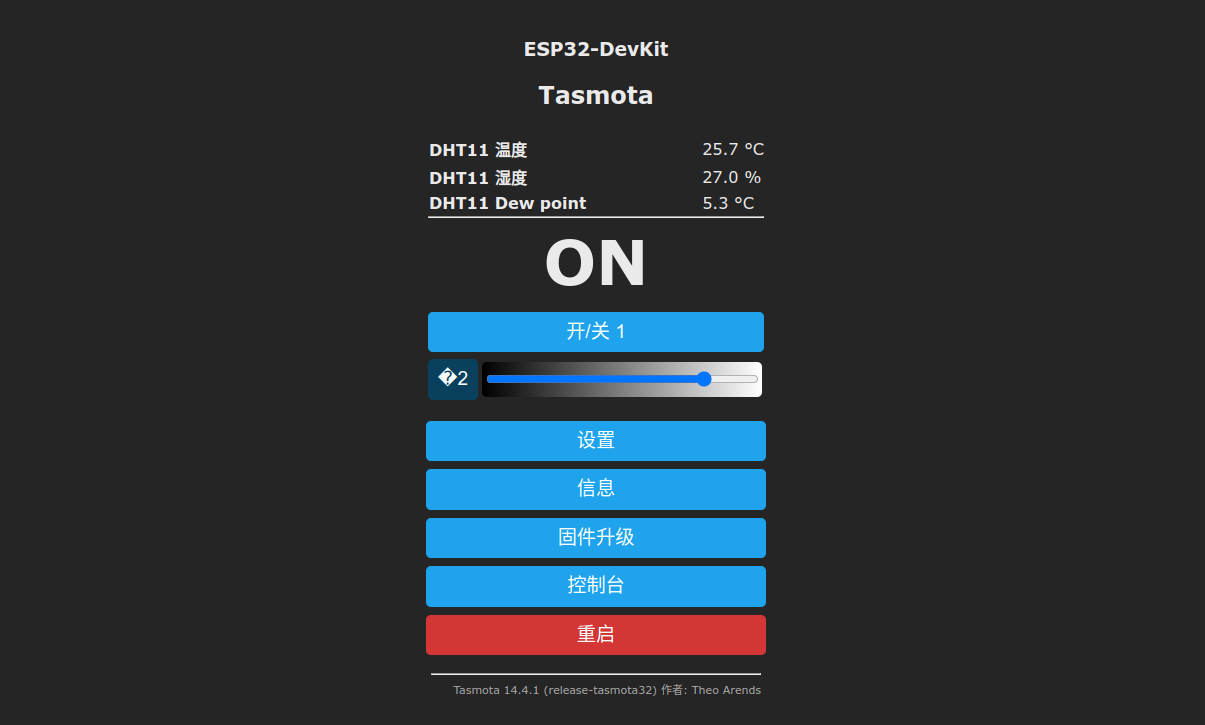
WebUI
Tasmota也支持通过网页UI形式直接控制,最简单的方式。
例如:直接点击 开/关1 即可控制第一个定义的Power;点击 ?2 即可以控制第二个定义的Power;滑动条可以控制灯的亮度。
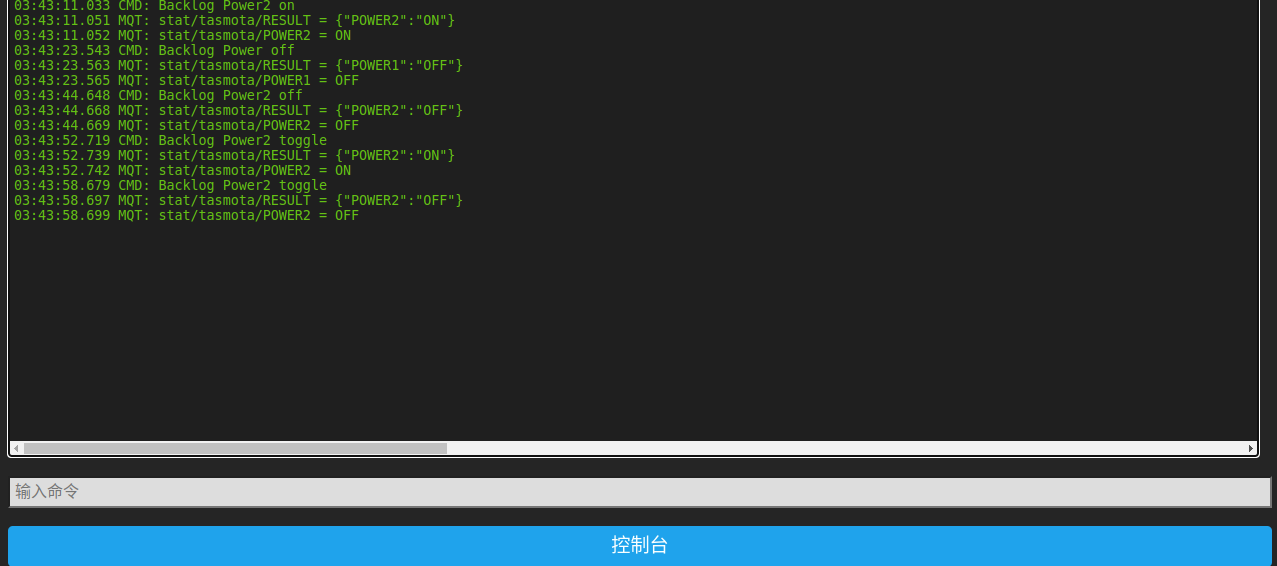
serial
Tasmota 也可以通过 WebUI 进入控制台,直接使用 serial 命令控制,例如:
1 | # 控制 Power2 |
固件构建
若用户想对于官方 Tasmota 一些功能进行阉割或额外适配一些新功能,那么可以从 Tasmota Github 上拉取代码仓库,在 “PlatformIO“ 中进行自定义修改,然后重新编译。
关于 PlatformIO 的简单介绍:
PlatformIO 最早由乌克兰的 Ivan Kravets 在2014年发起开源项目。
Ivan Kravets 博客网页对于 PlatformIO说明:
在 2014 年,我创立了PlatformIO,旨在解决嵌入式系统行业的多平台开发问题。我们独特的理念赋予嵌入式开发人员真正的自由 - 亲自决定使用哪种操作系统、集成开发环境和硬件。不再局限于特定的半导体工具链。一个开源生态系统 - 多种架构、开发平台和处理器系列!在 PlatformIO,我们认为嵌入式系统行业迫切需要重塑。不仅 IDE 和工具是使用 20 世纪 90 年代的技术构建的,而且嵌入式工程师的复杂要求也是如此。我们正在使用现代技术从头开始重新构想和重建嵌入式基础设施的核心组件。我们致力于通过免费、开源和下一代专业开发工具来改善工程师的日常生活。
PlatformIO(也称PIO)是一款开源且跨平台的嵌入式系统与产品程序的开发工具,可用于多种嵌入式架构与平台的开发。与通常与厂商绑定的嵌入式开发工具不同,PlatformIO支持多种嵌入式平台,例如STM32、STM8、ESP32、Amtel AVR、ESP8266、8051等。
PlatformIO的核心组件是称为“PIO Core”的命令行工具,基于Python编写,它可以独立于集成开发环境与文本编辑器使用。PlatformIO也为许多集成开发环境与文本编辑器开发了插件,包括Atom、Eclipse、Emacs、NetBeans、Vim、Visual Studio与Visual Studio Code。
PlatformIO支持单元测试与远程开发功能,还附带了简易的串口调试工具。